
Hey there, friends! We know how important it is to have a comfortable and convenient place to work out. That’s why we’re here today to talk about something that can transform your home into a personal fitness haven – installing a pull-up bar! Whether you’re an exercise junkie yearning for more variety or just want to bring some gym vibes to your living space, trust us, this guide is exactly what you need. We’ve got your back, so let’s dive right in and learn how to bring those gains home!
Get Ripped with the Hottest Pull-up Bars


Choosing the Right Pull-up Bar
When it comes to getting a great upper body workout at home, few exercises beat the pull-up. Strengthening the muscles in your back, arms, and shoulders, pull-ups can provide a challenging and effective workout. However, with so many pull-up bar options available in the market, choosing the right one for your home can be a bit overwhelming. But fret not, because we’re here to help you make an informed decision!


Types of Pull-up Bars
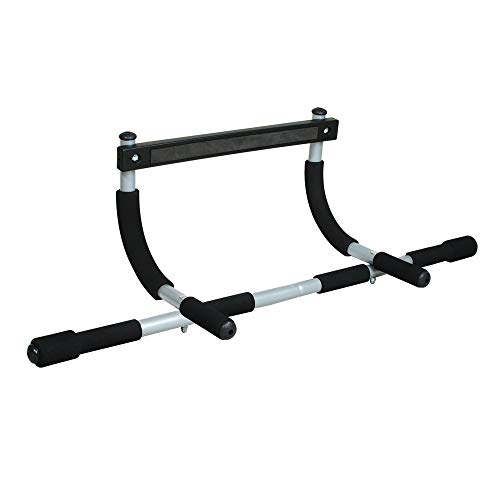
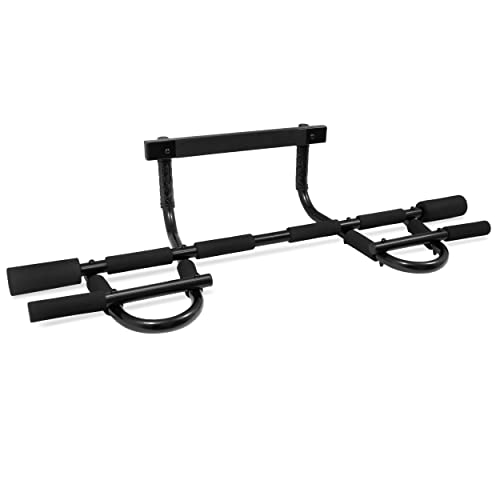
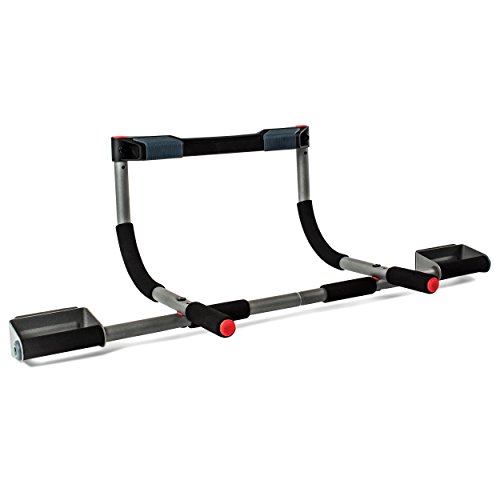
1. Doorway Pull-up Bars
Doorway pull-up bars are a popular choice for home workouts due to their versatility and ease of installation. These bars are designed to be installed in a doorway, using leverage to stay in place without the need for screws or drilling. Here are some key points to consider:
- Adjustability: Ensure that the pull-up bar can accommodate different doorframe widths to fit your specific doorway.
- Weight Capacity: Check the weight capacity of the bar to ensure it can safely support your weight.
- Grip Options: Look for pull-up bars with multiple grip options such as wide, narrow, and neutral grips for a variety of exercises.
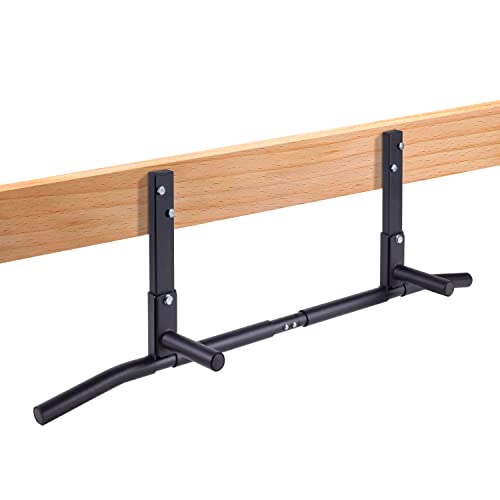
2. Wall-mounted Pull-up Bars
Wall-mounted pull-up bars are a sturdy and permanent option for your home gym. These bars are mounted directly onto the wall, providing maximum stability. Here are a few important factors to consider:
- Space: Make sure you have enough wall space to accommodate the length of the pull-up bar.
- Material and Durability: Look for bars made of high-quality materials such as steel for long-lasting durability.
- Grip Construction: Consider pull-up bars with comfortable and non-slip grip surfaces to prevent hand fatigue and enhance your workout experience.
3. Ceiling-mounted Pull-up Bars
Ceiling-mounted pull-up bars are ideal for those who have limited wall space or who prefer a slightly different range of motion during their exercises. Here’s what you need to keep in mind:
- Ceiling Height: Ensure that you have adequate ceiling height to accommodate the pull-up bar and your body during the movements.
- Installation: Check if the pull-up bar requires any additional hardware or professional installation for proper installation and safety.
- Weight Capacity: Confirm that the pull-up bar is capable of supporting your weight without any compromise on safety.
Factors to Consider
When choosing the right pull-up bar for your home, it’s important to consider the following factors:
- Space: Assess the available space in your home to determine which type of pull-up bar will fit best.
- Installation: Consider whether you prefer a temporary or permanent installation and choose accordingly.
- User Weight Capacity: Ensure that the pull-up bar can support your weight and doesn’t compromise on safety.
- Versatility: Determine whether you want a pull-up bar with different grip options to vary your workouts.
- Budget: Set a budget and look for options that offer the best value for money.
Comparison Table
To summarize the key points mentioned above, here’s a comparison table to help you make a quick decision:
| Pull-up Bar Type | Space Required | Installation | Weight Capacity | Grip Options | Price Range |
|---|---|---|---|---|---|
| Doorway Pull-up Bar | Minimal | Temporary | Varies | Multiple | $-$$ |
| Wall-mounted Pull-up Bar | Moderate | Permanent | High | Comfortable | $$-$$$ |
| Ceiling-mounted Pull-up Bar | Moderate-High | Permanent/Professional | High | Regular/Customizable | $$$-$$$$ |
In conclusion, choosing the right pull-up bar for your home gym depends on various factors such as available space, installation preference, weight capacity, versatility, and budget. Consider your specific needs and preferences to make a well-informed decision that will enhance your fitness journey. Happy pulling!
Preparing the Installation Area
Before you dive into setting up your pull-up bar, it’s crucial to ensure that you have the right space and structure to support it. In this section, we will guide you through some important steps to help you prepare the installation area.


Measuring the Space
The first thing you need to do is measure the space where you plan to install your pull-up bar. This will ensure that you have enough room to perform exercises comfortably. Here are a few key things to consider:
- Ceiling height: Measure the height from the floor to the ceiling to ensure that it is adequate for the pull-up bar. This is particularly important if you’re planning to do exercises that require an extended range of motion.
- Wall-to-wall width: Measure the distance between the walls where you intend to install the bar. This will help you determine if the pull-up bar will fit properly in the space you have chosen.
- Clearance: Consider the clearance needed around the pull-up bar to avoid any obstructions. Make sure there’s enough space for your body to move freely and for you to perform a full range of motion without hitting any nearby objects.
Checking the Strength of the Installation Surface
To ensure the safety and stability of your pull-up bar, it’s important to assess the strength of the installation surface. Here’s what you should do:
- Wall construction: Determine the type of wall construction you have. Check if it’s solid masonry, concrete, or wood-framed. This will help you choose the appropriate mounting hardware for your pull-up bar.
- Weight-bearing capacity: Identify the weight-bearing capacity of the wall or ceiling. You can refer to the manufacturer’s specifications or consult with a professional if you are unsure. It’s vital to ensure that the structure can handle the weight and force applied during your workouts.
Making Necessary Modifications
In some cases, you may need to make certain modifications to the installation area to ensure a secure setup. Here are a few adjustments you might consider:
- Reinforcing the wall: If the wall or ceiling lacks sufficient strength, you can reinforce it by adding a plywood backing. This will provide extra support and stability for your pull-up bar.
- Installing ceiling joists: If you plan to mount the pull-up bar from the ceiling, make sure there are appropriate ceiling joists available to support the weight. If not, you may need to consult a professional to install joists for added safety.
- Removing obstacles: Clear the installation area of any obstacles such as light fixtures, vents, or other objects that could interfere with your workouts. This will help you maintain maximum motion range and prevent accidents.
By following these steps and taking the necessary precautions, you can ensure a safe and secure installation area for your pull-up bar.
Remember, safety should be your top priority. If you’re unsure or have any concerns about the installation process, it’s always recommended to seek professional assistance.
Now that the installation area is prepped, you’re ready to move on to the next exciting phase – assembling and installing your pull-up bar! Stay tuned for our next blog post, where we’ll walk you through the step-by-step process.
In the meantime, if you have any questions or need further guidance, feel free to reach out to our team; we’re here to help!
Installation Steps
In this blog section, we will walk you through the process of installing your pull-up bar, ensuring it is securely mounted and ready to provide you with a safe and effective workout. Follow these step-by-step instructions, and you’ll have your pull-up bar up and running in no time!
Step 1: Gather the Required Tools
Before you begin the installation process, make sure you have the necessary tools on hand. Here’s what you’ll need:
- Power drill
- Drill bit
- Level
- Pencil or marker
- Stud finder (optional, but recommended)
Step 2: Selecting the Installation Location
Choose a suitable location for your pull-up bar. Consider the following factors:
- Ceiling height: Ensure you have enough clearance for proper range of motion during exercises.
- Wall space: Make sure the space allows for comfortable movement and positioning.
- Stud placement: If possible, locate the studs in the wall or ceiling to provide maximum stability.
Step 3: Marking the Holes
Using a pencil or marker, mark the spots where you will be drilling the holes for mounting the pull-up bar. Make sure these marks are level and accurately placed according to your desired bar height and positioning.
Step 4: Drilling the Holes
With your power drill and appropriate bit size, carefully drill the marked spots on the wall or ceiling. If you are drilling into studs, make sure to use a bit designed for wood or metal, depending on the type of stud.
Step 5: Mounting the Bar
Once the holes are drilled, align the mounting brackets of the pull-up bar with the holes. Securely attach the brackets using the screws provided with your pull-up bar. Double-check the alignment and ensure the bar is level.
Step 6: Testing for Stability
Give the pull-up bar a gentle shake to test its stability. If it feels loose or wobbly, recheck the screws and ensure they are tightly fastened. If necessary, make any adjustments to the mounting brackets to achieve a sturdy installation.
Step 7: Finalizing the Installation
Once you are satisfied with the stability of the pull-up bar, complete the installation by attaching any additional accessories, such as hand grips or straps, according to the manufacturer’s instructions.
Tips for Optimal Performance
- Ensure proper alignment: Position the bar at a height that allows your arms to fully extend during exercises without touching the ground.
- Check weight capacity: Be aware of the maximum weight limit specified by the manufacturer and ensure it can safely support your body weight.
- Warm-up and cool down: Incorporate warm-up exercises and stretches before and after using the pull-up bar to prevent injury and promote flexibility.
Remember, proper installation is crucial for the safety and effectiveness of your pull-up bar. Take your time and double-check each step to ensure a sturdy and reliable installation that will provide you with countless workouts ahead.
Once your pull-up bar is installed, you’ll be ready to take your fitness routine to new heights. So, get ready to challenge yourself, build strength, and achieve your fitness goals right from the comfort of your own home!
Safety Considerations and Maintenance
When it comes to exercise equipment, safety should always be a top priority. Whether you’re a beginner or a seasoned fitness enthusiast, taking the necessary precautions can help prevent accidents and injuries. Here are some important safety considerations to keep in mind when installing and using a pull-up bar:
Installation Precautions
- Secure Mounting: Before installing your pull-up bar, ensure that it is securely mounted. Follow the manufacturer’s instructions carefully to prevent it from coming loose while in use.
- Weight Limit: Check the weight limit of the pull-up bar and make sure it can safely support your bodyweight. Exceeding the weight limit can compromise the stability of the bar and increase the risk of accidents.
- Proper Positioning: Choose a suitable location for your pull-up bar. Make sure there is enough space around it to perform the exercise comfortably and safely. Avoid installing it near sharp or fragile objects that could cause injury if accidentally bumped into.
- Sturdy Framework: If mounting the pull-up bar on a doorframe, ensure that the doorframe is sturdy and in good condition. Weak or damaged doorframes may not be able to withstand the stress placed on them during use.
Safe Usage Guidelines
- Warm-Up: Always warm up your muscles before using the pull-up bar to reduce the risk of strains or pulls.
- Proper Grip: Use an adequate and comfortable grip on the pull-up bar. This will help maintain control and reduce the chance of slipping or falling.
- Controlled Movements: Perform pull-ups in a slow and controlled manner, without swinging or jerking your body. This will engage the target muscles effectively and minimize the risk of joint or muscle injuries.
- Listen to Your Body: Pay attention to your body’s limits. If you feel any pain or discomfort during exercise, stop immediately to prevent injury.
- Spotter: If you are a beginner or feel unsure about your strength and ability to perform pull-ups, consider having a spotter nearby to assist and provide support if necessary.
Maintenance Tips
Taking care of your pull-up bar will not only help prolong its lifespan but also ensure your safety during workouts. Here are some maintenance tips to keep in mind:
- Regular Inspection: Periodically inspect the pull-up bar for any signs of wear and tear. Check for loose bolts, cracks, or other damage that may compromise its stability. If any issues are found, address them promptly.
- Cleaning: Clean the pull-up bar regularly to prevent the buildup of sweat, dust, or other debris. Use a mild soap and water solution to wipe down the surface, and dry it thoroughly afterwards.
- Lubrication: Apply lubricant to any moving parts, such as hinges or pivots, to keep them working smoothly. This will prevent squeaking or sticking, ensuring a safe and enjoyable workout experience.
- Weight Distribution: To promote even wear and minimize stress on specific areas, vary the grip positions and hand placements during your workouts. This will help distribute the load more evenly across the pull-up bar.
- Protective Flooring: If your pull-up bar is mounted on a wall or ceiling, consider placing protective flooring underneath to cushion any accidental falls and reduce impact on the joints.
By following these safety considerations and maintenance tips, you can enjoy a safe and effective workout experience with your pull-up bar. Remember, taking care of your equipment is just as important as taking care of your body!
Wrapping it Up: A Step-by-Step Guide to Installing a Pull-up Bar in Your Home
In conclusion, installing a pull-up bar in your home is a fantastic way to level up your fitness game. With our step-by-step guide, you can confidently select the perfect bar, properly set up the installation area, and ensure a safe and secure installation. So why wait? Start reaping the rewards of a pull-up bar workout right at home! It’s time to take your fitness to new heights.